Friday, October 11, 2013

The ABCs of Home Improvement Projects: Educational Point B


In school we learned our ABCs to speak the English language successfully. Succinctly moving in a logical way from A to B to C and through the remaining alphabet taught us how to write and speak words. Armed with knowledge, the means to communicate verbally and to write well is the goal. Home improvement projects follow a similar pattern and if you skip a step, it can be challenging to recover.

If you missed first Starting At Point A, where I reviewed three steps 1) Get inspired, 2) Do Your Research, and 3) What's The Magic Number, click here to start from the beginning. Otherwise, we are moving forward in The ABCs of Home Improvement Projects: Education Point B.
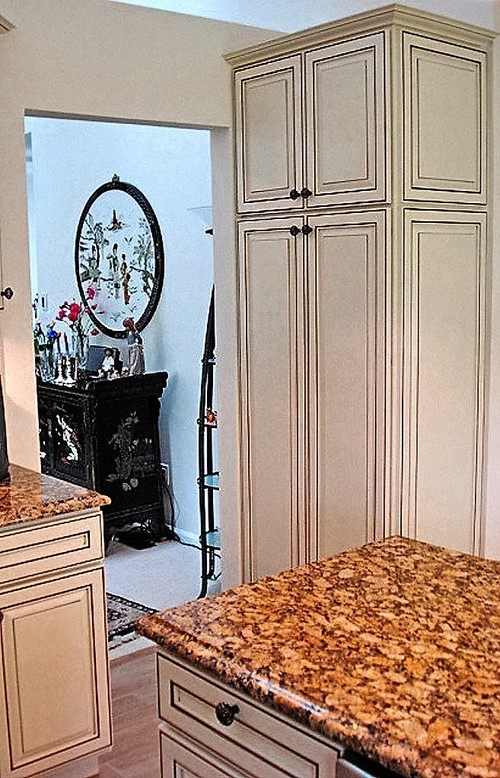
Educational Point B

Photo Source:  Tumblr
A decision to take the next steps is necessary to complete a home improvement or repair and now time sounds like a nasty little word that slows down the process. It is true that organizing the right people, discussing the facts about the your project, and connecting takes time and patience before physically starting a project. Did you ever rush to get out of the supermarket only to find there was one really important item missed during the shop?

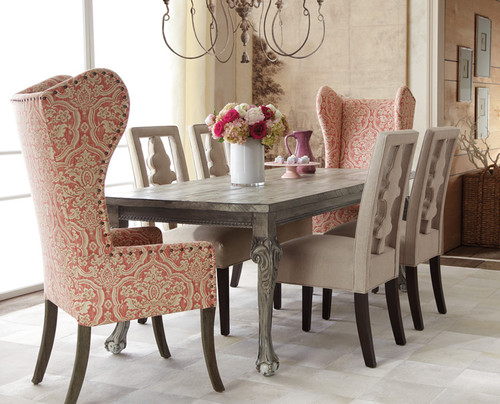
Getting The Details In Point B

Photo Source

Step 1:  Call-in or go-to the experts! 

 
Armed with inspiration and pricing knowledge, it's now time to call-in or go-to an expert.  The best resource for hiring an expert comes through the referral of a friend, family member, Realtor, or other professionals who work within the industry.  By clicking on the following professionals trained in designing home related projects, you can read about their roles in the field of home design:  Architect, Interior Designer, Interior Decorator, Kitchen & Bath Expert.  Keep in mind, professionals may combine two or more related fields of interest and they may or may not belong to a specific associated membership program but still carry the credentials and/or work experience related to their field of expertise.


Homeowners looking to complete there own projects may opt to go to a product specific showrooms and work with an on-sight designer and/or decorator.  The good news is that often their services are included in your shopping experience.  Do consider that showroom professionals are paid to sell their companies products.  As a homeowner, you may need to visit several showrooms to gain differing product specification in order to make an informed decision (e.g. kitchen cabinets, tile, plumbing fixtures). As long as you don't mind the leg work and time involved in research, then a DIY project is up your alley.  Otherwise, paying a professional to research, design, and present options that are available to Trade Professionals may be the direction a busy homeowners should go and it is ultimately worth the price of services rendered.


Last, but not least, many professionals are listed on a variety of home improvement sites.  Angie's List, Home Advisor, Houzz, Interior Design Pro are a few and many of the sites qualify the business for you.  Plus your local county clerk's office (e.g. Westchester County, NY) will offer a list of Licensed and Insured Plumbers, Electricians, and Contractors for your local area.  Bottom line, do a bit of checking by getting a referral, a reference or two, or do the research for a qualified professional.


Step 2:  Gather Your Estimates

 
Many professionals offer a free estimate, initial consultation, or paid consultation to assist in creating your dream.  Gathering information for a budget is critical before you start reaching out.  

When you call-in the experts, the purpose of your meeting is to not only gather information on their qualifications, but also to determine if you like the company, the professional, and their work.  Some projects may be as short as a day or two, while others may involve up to a year or two to complete.  You better be able to connect with the individual and like their work.  Otherwise, it may be a painful process rather than good experience where you enjoy the company of a knowledgeable trade professional.
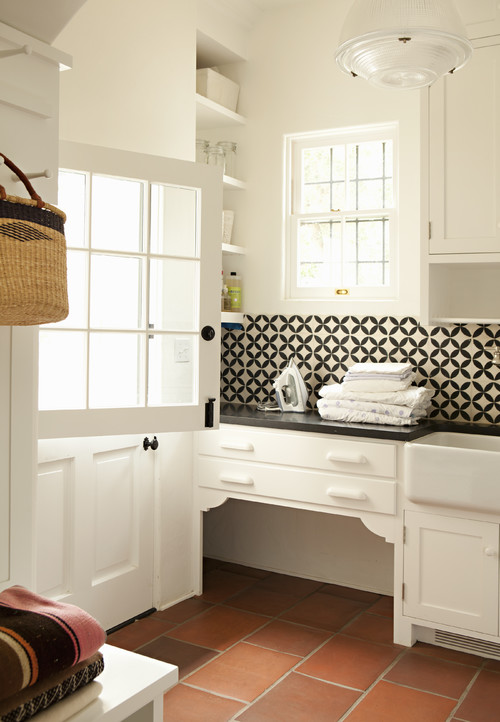
 
Photo Source
Start your meeting by discussing your project needs and inspirations.  Be prepared to talk about your family's motivation for starting the project (e.g. expecting a baby, a parent is coming to live, or the children are now finished college).  These details expand on the design by revealing the emotional and functional purposes of the home improvement project.  Next, a review of the space, project, or architectural plans may be in order.  Measurements, pictures, or additional questions will likely arise in order to receive an accurate price and determine if the professional relationship is a good fit.  It may take a day or up to a week or two to get an estimate on services, products, or the combination of both.  Be sure to ask when you can expect to receive the estimate and get a minimum of two to three estimates for price comparison, time-lines, and the scope of work required for your project.  

Step 3:  Make An Informed Decision 


The estimates are in...but, what does it all mean?  Finding remodeling costs for a project may be a little daunting, but the hourly rate, cost-plus, percentage of projects, etc. seem to all have their own set of rules.  Depending on the trade or profession, their pricing language is thrown around without a way to measure the most cost-effective approach - or, so it seems. 

The price for services can be separate (i.e., hourly rate), included in the overall project (e.g., by the square foot, flat rate or project fee) or added to the trade pricing of thee product for ordering, tracking, and processing (e.g., cost plus materials).  If you are purchasing the materials and providing it to the professional to install, then an hourly rate or by the project fee would be the way to go.  Otherwise, utilizing a trade professionals access to vendors and manufactures will result in reduced pricing for materials that could cover the fees of their services (e.g. interior decorator or designer) with the added benefit of a new kitchen, bath, or whole home interior design.

 
As I mentioned in Starting At Point A, an in-house designer rate may be included with the purchase of furniture, cabinetry, tile, etc.  But, if a design is required (e.g. kitchen or bath), and the professional must develop the floor plan before the product can be purchased (e.g. cabinetry, furniture, etc.), a non-refundable design retainer may be required.  Design Retainers are a commitment for services that result in an overall concept, can be applied towards the overall budget, or simply for services rendered.  It is important to clarify this with the store, employee, or professional.

Here are a few links to visit for pricing structures: 


Next week, the final installment of The ABCs of Home Improvement Projects:  Follow Through Point C.
 
Follow my blog with Bloglovin

Friday, September 27, 2013

The ABC's of Home Improvement Projects: Starting At Point A

Access to inspirations for home improvements projects has come a long way from the earlier days of Bob Villa and This Old House programing that offered insight into the complicated forum of "How-To" complete a home project, a home renovation, or a restoration of an old home. As one of the largest investments the average person will make in their lifetime, limited information was the norm with only a handful of network programs, home magazines, and the local trusted contractors with their list of trade people to assist in the repair or improvement.

Today, information is everywhere and some homeowners and professionals wonder if it is too much of a good thing with access to the Internet, television, and organizations that specialize in the home improvement field. Media - whether on-line, through television programming, or via print swing in opposite directions by a) creating a point of view that projects are easy with their before and after pictures, b) television thirty minute programming, or c) feature programs and news reports of contractor nightmares, rip-offs, and projects gone bad.

The professionals that successfully move a project from point A to point C is fascinating and certainly captures our attention. The short pieces of information, news, and entertainment inspire a homeowner to get started. But, what about point B? Teachers taught us to follow our ABC's for a reason. Getting a home project started may be challenging, but if you follow the ABC's of home improvement, you'll be much happier with the end result.


Before & After Kitchen Renovation
Before Photo By: Jeanne At Gallo Rosso Kitchens    After Photo By: True Identity Concepts

As an Interior Design professional, improving upon an interior space involves working with many homeowners, trade professionals, and contractors. Motivation for an upgrade can vary from person-to-person, but bottom-line the return of investment (ROI), aesthetic outcome, and quality of life are the top motivating factors for renovating and/or designing a new space. My projects range from a full renovations of a kitchen or bath, refurnishing or space planning living spaces, to decorative finishes such as window treatments, new flooring, interior/exterior paint colors, and more. Let's face it, when it comes to our homes, no two projects are the same and that is the difficulty in moving from point A to point B, and getting started in point C.


Photo Source:  True Identity Concepts Tumblr

Starting At Point A

 
Whether you recently purchased a new home, a family decision is reached to upgrade a living environment, or a simply home repair leads into a home improvement project, it's time to get answers to two basic questions: How much will it cost, and how much of its value can you recoup later? Think about it like this, when you are planning for a vacation, you get inspired by a particular place and begin the planning by determining 1) where you wanted to go, 2) how you are going to get there, and 3) how much will it cost.

 Step 1:  Get Inspired!

Photo Source:  Cultivate

The American Association of Interior Designers (ASID) offers the best advice for homeowners to simply start a project by gathering pictures of spaces, materials, and designs that 'feel' right' via television, web-site, blogs, or photo galleries. I suggest starting an actual folder (on-line or hard copy) and begin by filling it with product and photos that appeal to you. Do not think about how it will work in your space. Simply let yourself be inspired by a particular style, feature, or product. A pattern will develop producing a kind-of wish list that will take you to the next steps. It's like a Holiday or Birthday Shopping Wish-List. You may not get all of the items on it, but any one or more of the items received would be a pleasant surprise. Remodeling Magazine list some of the top amenities homeowners want in their spaces.

Step 2:  Do Your Research!

Source: eLocal.com

Consider the Return Of Investment on the home improvement project. Certainly, the motivating factors could be to sell your home, create a better flow in the space, or update an aesthetic feature within the home. Knowing how long and how much value the project will add to your home value is important. The National Association of Realtors (NAR), Remodeling Magazine, and House Logic offer the latest cost vs value research for home remodeling projects.

There are a lot of remodeling cost estimators on the Internet that are free. If need be, dig a little deeper based on a related field of expertise, professional organizations, or specific project (e.g. kitchen and bath renovation).

Step 3:  What's The Magic Number?


Generally, when you buy a car, you know how much it will cost. Advertisements, research, and experts chime in on the best must-have features and bells and whistles offered in a new vehicle that matches your budget, lifestyle, and aesthetic. A home improvement project is determined in the same way. There are standard, mid-range, or luxury products and designs for all major home renovations, construction or additions, and products or services that fit within these categories. A must-have versus a would-like are two different points of views so have a number in mind that you will not exceed.

On-line resources offer a glimpse into specific project costs. Now, not all models i.e., homes are the same, but an informed consumer can make the processes a little easier. Houzz, National Kitchen & Bath Association (NKBA), Fixr, Consumer Reports, Remodeling Magazine, and House Logic are reliable places to get dollars associated with home improvement projects.

Do your research to get a sense of the costs associated with a home project, product, or repair. Planning to spend a bit of your saving now or in the near future creates an informed customer who can discuss their plans with professionals and maximize the time spent during a consultation. Setting a budget number is a commitment that will test your relational fortitude and remove the relational strain caused by remodeling.

Return to The ABC's of Home Improvement Projects and Educational Point B for your next step then move to Follow Through Point C to get your design started.

Friday, September 13, 2013

The Big Cat Obsession - Cheetah, Leopard, and Jaquer Prints


Follow any fashion trend, celebrity siting, or decorating blog/magazine and one thing is for sure - big cat prints will always capture our attention.  Whether it is a small accent such as a pillow, lamp shade, decorative piece, or a big focal point within a room and especially a gorgeous pair of shoes, a handbag, or piece of clothing...that big cat is here to stay.

Image:  The Decorista

Gathering a few of my favorite interiors displaying these majestic animal prints was almost therapeutic.  My favorite, the three big cats: Cheetah, Leopard, and Jaguers.  If you want to know more on how to spot the difference, check out The Big Cat Blog, but as a quick reference, the color combinations, type of spot pattern, and their placement gives you a head start identifying your cat.

C=Cheetah, L=Leopard, J=Jaguar
Image: Interior Collective
In the meantime, almost any upholstered piece can handle the bold print within any style of home.

Traditional Chairs in a Modern Dining Room Setting

Image:  Domaine Home

 A Well Placed Throw in an Eclectic Bedroom

Image:  Pinterest

Front and Center, An Amazing Coffee Table Ottoman Among Post Modern Pieces 

 Image:  Tumblr

 Pillows That Connect The Mix of Solid Colors and Textures

Image:  The Lennoxx
Making the big cats a prominent feature in your space works well within unusual setting.  Tiling a bathroom wall, adding wallpaper behind a feature wall, integrating carpet tiles for everyday seating, or going bold with a large piece of furniture may do the trick.  Either way, the print has the power to hold its own in any environment.. 

Image:  Imactoy


Image: La Dolce Vita


Image: Flor


Image: Chic & Posh

 
Don't be surprised if you see me in any version of this print feeling comfortably chic in a beautiful scarf, pair of flats, or a favorite bag. My obsession with this print has stood the test of time...and it will do the same for your interior spaces.

Images: Scarf Pinterest, Shoes Pinterst, Tote Pinterest

Sunday, September 8, 2013

Busting Into Home Decor - Trending 2014

The Bust, or otherwise known as a head or portrait, is the next trend expected to make its way into interiors for 2014.  Generally, it's not just any Bust (get your mind out of the gutter), it's the Neoclassical Bust.

The Neoclassical styles of the 18th and 19th century rears its classical head above the rest with a more serious and less emotional side of the subject matter.  But, that's not always the case.  The classical figures are available in a variety of materials and fitting into your decor is simply a matter of being creative in application.

 An entry displaying a repetition of the Busts, creates a beautiful formal setting in white plaster.

 
Photo Source:  Chic + Glamorous


 Place a bust in a kitchen or bath to boost the level of sophistication.

Photo Source:  Tumblr
Photo Source:  Pinterest

A bronze bust creates a focal point for a tablescape within a modern decor.

Photo Source:  Tumblr

Or opt for a colorful bust that sits within a bookshelf display with its whimsical placement.

 
Photo Source:  Pinterest

 If you think their classical style doesn't have a sense of humor, then consider the garden style variety.

Photo Source:  Facebook
Keep your head (pun intended) about their placement or function.  
They come in handy for holding a few strands of pearls or a fashionable hat or scarf.   

 
Photo Source:  Pinterest


Saturday, August 24, 2013

Taking A Flight With Wingback Chairs

I love being surprised in unexpected places!  Passing by an amazing window display, while doing a bit of antique art shopping, did just that.  I had to take a moment away from my client and capture a picture of this wonderful wingback chair in crushed orange velvet, nail head details that accentuated the straight lines, and the beautifully accessorized pillows that every designer and homeowner is compelled to use in colourful textures and geometric patterns.

Photo By:  True Identity Concepts

This modern version wing chair is all grown up (literally), but the features of the wingback chair are still in tact.

The traditional wingback version dates back to the 1700s with many of their original features in tact.  A fully upholstered chair with a 90 degree angle high-back, sides that extended up from the arms, and legs that define the period, these chairs were intended to protect us from the cold drafts and those big roaring fires.

Photo Source: Design Indulgence
 
Today, the wingback chair continues to use its wings to wrap us in warmth and beauty -- high or low back styling, curved or straight winged arms, legs in many shapes and sizes, and textures that fit into any style home or decor -- their sophisticated presence cannot be denied.
 
 
Traditional, Rustic, Eclectic, or Modern...whatever your style, give your room a pair of wings and it will take a stylish flight!


Sunday, August 11, 2013

Remodeling Your Home - What About Pet-Friendly Spaces?

In preparing for a home improvement project, the majority of concerns for homeowners are the aesthetic and cost of the project. But as a design professional, I like to dig deeper into the details to uncover the functional and family lifestyle that should be included.  Questions and answers are exchanged, pieces of the puzzle begin to fit into place, and design solutions start to emerge.  

Once the Q&A has finished and I get ready to take a look around, my attention often shifts to the furry family members who undoubtedly makes their presence known.  I sit back down and start to ask some additional questions that include the family pet since they were missing from all the notes, pictures, and bulging folder that contains the wish-list of ideas.

Photo Source:  Pinterest

Considering that the Humane Society reports that 4 out of 10 households have a dog or cat, while the American Pet Products Association reports an even higher number for our furry friends, I have to believe that including them into the questioned asked for home improvement project would only benefit the entire family.

Photo Source: Houzz
 
 
I find that kitchen and bath renovations get all the perks that make life a bit more convenient. Small changes such as increasing the height of a pantry shelf gives enough clearance to roll a food storage bin in or out or using that dead space under the stairs as access for the kitty litter would work wonders.
 

A Few Questions To Consider

  • What type of food storage do you use for your pets and where is it stored?
  • What rooms do your pets sleep?
  • How do you groom your pets?
  • Do you house your pets in a certain location at night or while you are at work?
  • Are there any health conditions that need to be addressed?
  • If there is one thing that you could do to improve your pet's environment, what would it be?
Photo Source: Tumblr
 
A Laundry or Mudroom space allows a family pet to stay involved in all of your activities or out-of-the-way of guests. The best improvements are organized and planned into a new space before the remodel is started.


Pet-Friendly Home Improvement Ideas

  • Built-in Ramps, Stairs, Window Seats, or Trees
  • Stain Resistant Carpets or Floors
  • Storage Areas for Pet, Supplies, or Kitty Boxes
  • Built-in sleeping areas, beds, or removable covers
  • Indoor Grooming Areas (e.g., Mudroom, Laundry Areas)
  • Built-in feeding stations
  • Pet access to other areas (e.g. basement, outdoors, under stairs)

We do love our animals!  I personally have two cats that fill me with joy.  They give my family unconditional love, keep us company when we are alone, and offer hours of entertainment. 

As you gather your ideas for your next home improvement project, be sure to add your cat or dog designs into the mix of solutions and feel free to share your pet-friendly design solutions.

Click here to visit my Pet Friendly Pinterest Board for more ideas.

Friday, August 9, 2013

3 Organizational Steps For Space Planning A Home Move

Moving into a new home based on marriage, relocation, a first home purchase, downsizing, or even a temporary move (e.g. building a new home or adding an addition) has exciting possibilities with chances to make beautiful, new memories.  There are a lot of checklists to prepare for a smooth move whether you are doing it yourself or paying a moving company for their services. 

All of the information available has a few things in common -- saving you time, money, and aggravation.

Photo by Better Home & Gardens

I can't tell you how many times I moved or relocated locally, across state lines, or for business before I landed in New York.  This experience along with my Interior Design business has taught me that space planning for a new home will make the process of moving a lot smoother once you know what to purge, what to pack, and how it will fit into your new spaces.

Step 1: Take Pictures & Get Measurements

It's a great idea to take inside pictures of your new home along with the measurements of the spaces so you can make decisions on what to purge or and what to keep in your existing home.  Ask your rental agent, realtor, or homeowner for a copy of the plans.  When more detailed measurements are needed, hire a design professional or grab some graph paper and a tape measure and do-it-yourself.  For those who tech savvy, making a digital space plan a nice visual that you can view on your tablet, phone, or home computer.

Step 2:  Start Planning The Furniture Layout


Since you already know the furniture pieces in your home, start planning the rooms by function e.g. Living Room, Dining Room, and Bedrooms.  There are many on-line programs that allow you to create a layout based on your measurements and the ability to arrange furniture to see what fits. Olioboard, HomeStyler, and most furniture stores offer programs that help with computer generated models. Would you rather work with your sketch or blue prints?  Then Homeplanner offers pre-cut furnture pieces for the arrangements of hand-drawn floor plans. Whatever method is used for planning the new spaces, you'll know which pieces to keep, sell, or give away and what new items need to be purchased.  Here are some common sizes for your Living Room, Dining Room, and Bedroom Furniture are found here.

Step 3: Take An Inventory of Your Furniture

It may sound like a daunting task, but taking an inventory of the furniture plan for each room will help the movers organize and place your pieces more efficiently.  Moreover, an inventory of your home is necessary for added home insurance policy coverage.  A simple word document or a more advanced Excel spreadsheet will get you started.   I like the idea of adding a photo for a quick visual reference.  If you are using a spreadsheet, then use a color system to label the rooms.  This list can serve as quick direction during your move.  Coordinate a color label for boxed items and the rooms.  Trust me, the movers and any enlisted family or friend will be happy help give direction. 

Gather your supplies: measuring tape, camera, graph paper, and color coded packing tape!  Moving is never easy, but good space planning does make the process a bit less stressful.  If you like checklists to get your move started, Real Simple offers one that helps you plan two months in advance.
Photo Source: Micasarevista
Need professional Space Planning?  Contact True Identity Concepts here to discuss the optional services available for your home move.

Monday, June 24, 2013

How To Make An "Interior Designer" Sandwich

Who doesn't enjoy a good sandwich with its delicious combinations of fresh and unique ingredients surrounded by the perfect pairing of homemade bread that can turn any lunch, dinner, or midnight snack into a mouth-watering moment filled with culinary delight.

Okay, but this is an interior design blog and talking about sandwiches does not seem to fit with the overall theme...or does it?
Photo Source: Pinterest

I'm thinking about the role of the interior designer as it relates to the sandwich. Somewhere in between (pun intended) the do-it-yourself (DIY) homeowner, interior decorator, contractor, and architect sits the exquisite, often invisible role of an interior designer. A professional who just wants acknowledgement for their place in the very skilful combination of ingredients that ultimately lends itself for the creation of a great interior designer sandwich.

If we compare the roles of an architect, contractor, interior designer, and interior decorator to the four main ingredients of a sandwich, then you will need to gather the bread, the spread, the main ingredient, and the secondary ingredient to complete a masterpiece.  Given our affinity for looking at beautiful spaces, it doesn't surprise me that the first area of consideration for a homeowner is the aesthetics.  Knowing we eat with our eyes first, researching and saving images to refer back to at a later date for inspiration makes FacebookHouzz, Tumblr, and Pinterest (to name a few) a pretty resourceful way to serve up our favorite spaces in any flavor combinations minus the processes or people who make these beautiful sandwiches.

Are there any DIY enthusiast out there who thought they could complete a project simply by collecting photos and products and found that making the meal was harder than it looks? You betcha!
Let's think about the images that make-up these spaces and compare it to the chef's kitchen within a restaurant.  The architect built the structure, the interior designer created the layout and specified the furniture and materials for the kitchen and seating areas, the decorator added the finish touches to attract the customers, and the contractor built it.  A bit of cross-over or dual hats worn between the professional roles (i.e., architect/design, interior designer/decorator, contractor/design) may apply, but overall they work together to complete the space.  Comparatively in the kitchen, the Executive Chef cannot create and serve the food without having a Sous Chef, a Station or Line Chef as well as the other employees (e.g. dishwashers, bus boys, or wait staff) that offers and entire experience, which ultimately leads to a beautiful plated culinary presentation.
I might be inflating my role as the main ingredient with a complimentary second ingredient and spread (i.e., decorating) within my interior designer sandwich, but I must say we kinda' play the mediator between the architect and the contractor -- who, by the way, are the wonderful slices of bread.  The homeowner may decide what type of lettuce and spread they would like to have that inspires their club, sub, wrap, or open face sandwich (or traditional, transitional, modern, and/or contemporary style), but the interior designer selects the ingredients that will bring it all together to create the inspiration.
 
Coordinating with the architect trained in selecting the right type of bread (or building shell) that will satisfy your hunger and create a foundational support, an interior designer's training and creative process adds many ingredients that enhance the taste by coordinating the layering of ingredients and finishing details that make our taste buds salivate (refer to images). Think about it like this, if you have the architect and the contractor but neither one knows what will be inside, how can they enhance the interiors to fit the overall aesthetics if they don't coördinate the interior designer selections and ideas into the processes of building your sandwich?

My "interior designer" sandwich requires that I specify ingredients that are grown locally for my clients, grown in organic conditions that will sustain the family, and is easily enjoyed by the entire family. Yup, that's right, it is a healthy sandwich that not only looks and tastes good...it's good for you! It is a green friendly meal that offers sustainable products that are environmentally sound and accessible to family members...plus, my interior designer sandwich can be presented in a way that enhances the families palette preferences and served to coördinate with its intended ambiance.
 

Wouldn't it be easier at the beginning to have all the professionals go shopping together? A coördinated effort to bring you the best meal ever! The next time you buy your bread, think about all the people who can give you the best ingredients. You can have a sandwich filled with "I wish I would have remembered to include..." or you can experience the best interior designer sandwich that reflects your families true (culinary) identity. Creating it right from the beginning leads to a beautiful meal and a delightful experience. Bon Appetit!
 
Want to learn more about the role of an Interior Designer and the difference between an Interior Decorator? click here. Then decide, what's your favorite interior designer sandwich?